Event HandlingJ8 Home « Event Handling
In previous lessons in the section we have created different types of Swing components which all share one thing in common; when we have interacted with a component, by for instance clicking a button, the only thing that happens is that the look of the component changes when is is depressed and reverts back when released. What we need is a mechanism where we are alerted to a user interaction (user event), such as a button being clicked, and make a response to it. In this lesson we look at how we can intercept user events and action them, which is known as event handling.
Before we show any code examples we need to understand the sequence of actions that occurs when a user event happens. The operating system knows when we move the mouse, click a button, press a key and
so on and determines which programs, for our purposes which Java applications, should know about the user event and passes it on to them. We achieve this by setting up listeners from the Java Event
classes which are held in the AWT and processing the user event that has occurred by implementing the required listener interfaces and overriding the method to action the user event
in question. The overridden method gets passed information about the user event in the form of an EventObject which contains a reference to the object upon which the user event
initially occurred. Our programs can contain one or several types of listeners and actions to be performed on them.
The following diagram shows, from a Java viewpoint, what happens when a user interacts with an application on their computer via the keyboard or mouse.

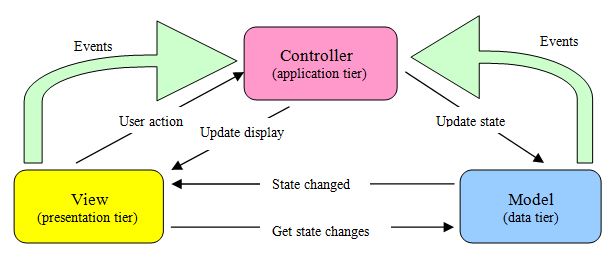
In the very first lesson of this section we spoke about GUI Concepts and the complexity of writing GUIs. We can diffuse complexity by using design patterns and we looked at the Model-View-Controller (MVC) Pattern whose aim is to separate the tasks involved in creating a GUI application into three areas, these being as the name suggests the Model, View and Controller areas.
The diagram below is an updated view of the MVC design pattern diagram from the GUI Concepts lesson showing how our events fit into it:
Event Types Top
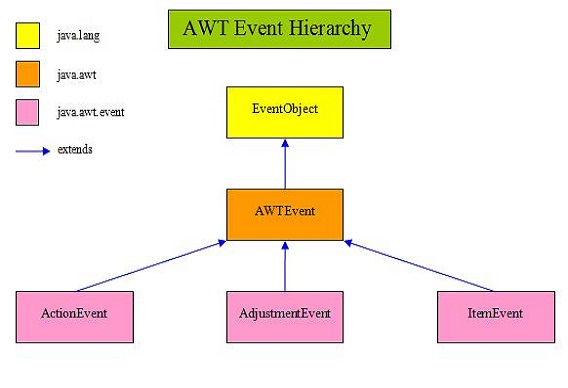
All the events that can happen within our GUIs are subclasses of the AWTEvent class which is located within the java.awt package. The subclasses are located within the java.awt.event
package. The vast majority of GUI user events are covered by three classes within the java.awt.event package, these being ActionEvent, AdjustmentEvent and ItemEvent.
The following diagram shows the structure of the above classes covered on this site for creating our own GUI applications. All event state objects are derived from the EventObject root class and
all AWT events are derived from the java.awt.AWTEvent class. The three classes within the java.awt.event package derived from AWTEvent indicate that a component-defined
action pertaining to that event has occurred.
The table below lists the three classes within the java.awt.event package derived from AWTEvent, their listener interface and method and the components associated with each of them.
Click a link in the table to show working examples of the listener interfaces you're interested in.
| Listener Interface | AWTEvent Class | Interface Method | Swing Components |
|---|---|---|---|
Action | Action | void actionPerformed( | JButton, JCheckBox, JCheckBox,
JMenu, JMenuItem, JRadioButton, JTextfield, JToggleButton |
Adjustment | Adjustment | void adjustment | JScrollBar |
Item | ItemEvent | void itemState | JButton, JCheckBox, JCheckBox,
JMenu, JMenuItem, JRadioButton, JToggleButton |
As you can see from the table above a Swing component can have multiple listeners attached to it but the listener will only do a callback to the interface method for the type of event that triggered it. The following diagram shows how we setup event handling for a button click and how the various parts of the table above interact with each other to allow us as programmers to respond to this user event.

Ok, that's enough about the mechanics of events, the next three sections show working examples of the listener interfaces for the AWT events mentioned above.
Using the ActionListener Interface Top
The ActionListener listener interface is used for receiving action events. Any classes interested in processing action events should implement this interface. An object created with the class is
registered with a component using that component's addActionListener() method. When the action event occurs on the component we have registered, the actionPerformed(ActionEvent e)
method of the object is invoked.
In the following example we create a single button and change its label each time the button is clicked.
package info.java8;
import javax.swing.JFrame;  // An interactive window
import javax.swing.JButton; // An interactive button
import java.awt.event.*; // AWT event package

public class OurActionListener implements ActionListener {
    JButton btn;
    int count;

    public static void main (String[] args) {
        OurActionListener oal = new OurActionListener();
        oal.start();
    }

    public void start() {
        JFrame jf = new JFrame("Using the ActionListener Interface");
        // Create a JButton using our instance variable
        btn = new JButton("I have been clicked " + count + " times.");
        // Register the JButton with our OurActionListener object
        btn.addActionListener(this);
        // Add JButton to frame, set size and display it
        jf.add(btn);
        jf.setBounds(300, 200, 568, 218);
        jf.setDefaultCloseOperation(JFrame.EXIT_ON_CLOSE);
        jf.setVisible(true);
    }

    // Implement the only method from the ActionListener Interface
    public void actionPerformed(ActionEvent e) {
        count++;
        btn.setText("I have been clicked " + count + " times.");
    }
}
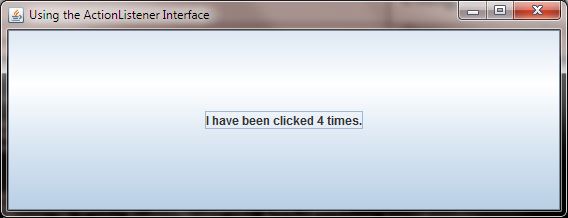
The following screenshot shows the results of compiling and running the OurActionListener class and pressing the button 4 times. We implement the ActionListener on our OurActionListener
top level class. We create an instance of OurActionListener and call the start() method with this object. We then create a frame and and a button and register the button with the invoking
object (this), which is our OurActionListener object called oal. We then set up our frame and implement the only method within the ActionListener interface
which is actionPerformed(ActionEvent e). Every time we press the button this method is invoked and we add to a count and pass this to the button's label so we can see it change each time.
But how does this work when we have multiple buttons and we want each to do something different? We can't have more than one version of the actionPerformed(ActionEvent e) method in the class or the
compiler gets upset. When we have more than one component within a class that uses the same listener implementation method and we want that method to do different things for each component then we have to put
each occurrence of the method within its own inner class or separate each one out using the passed EventObject. For a refresher on inner classes and how they work see the Nested Classes lesson.
In the following example we get around the above conundrum using inner classes. We create two buttons that use separate variables and change the label for the button in question each time it is clicked.
package info.java8;
import javax.swing.JFrame;  // An interactive window
import javax.swing.JButton; // An interactive button
import java.awt.*;          // AWT
import java.awt.event.*;    // AWT event package

public class OurActionListener2 {
    JButton btn1;
    JButton btn2;
    int count1;
    int count2;

    public static void main (String[] args) {
        OurActionListener2 oal2 = new OurActionListener2();
        oal2.start();
    }

    public void start() {
        JFrame jf = new JFrame("Using Multiple Components With The ActionListener Interface");
        // Create 2 JButtons using our instance variables
        btn1 = new JButton("Button 1. I have been clicked " + count1 + " times.");
        btn2 = new JButton("Button 2. I have been clicked " + count2 + " times.");
        // Register our JButton via different inner classes
        btn1.addActionListener(new addActionListener1());
        btn2.addActionListener(new addActionListener2());
        // Add buttons directly to two regions of BorderLayout of frame, set size and display it
        jf.add(BorderLayout.NORTH, btn1);
        jf.add(BorderLayout.SOUTH, btn2);
        jf.setBounds(300, 200, 568, 218);
        jf.setDefaultCloseOperation(JFrame.EXIT_ON_CLOSE);
        jf.setVisible(true);
    }

    // Inner class 1
    class addActionListener1 implements ActionListener {
        public void actionPerformed(ActionEvent e) {
            count1++;
            btn1.setText("I have been clicked " + count1 + " times.");
        }
    }

    // Inner class 2
    class addActionListener2 implements ActionListener {
        public void actionPerformed(ActionEvent e) {
            count2++;
            btn2.setText("I have been clicked " + count2 + " times.");
        }
    }
}
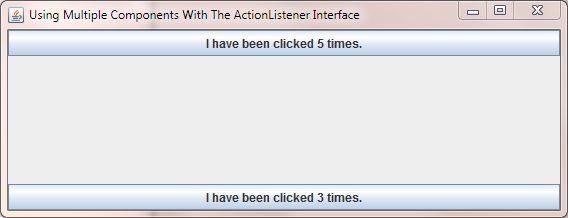
The following screenshot shows the results of compiling and running the OurActionListener2 class and pressing the top button 5 times and the bottom button 3 times. This time we don't implement the
ActionListener on our OurActionListener2 top level class but instead create two inner classes which each implement ActionListener. We create an instance of OurActionListener2
and call the start() method with this object. We create our frame and two buttons and register these separately with our inner classes. We then set up our frame, adding our buttons to the NORTH and
SOUTH regions and implement the only method within the ActionListener interface within each of our inner classes. Every time we press a button we invoke the actionPerformed(ActionEvent e)
method on the inner class that that particular button is registered with. Within the method we add to a count and pass this to the button's label so we can see it change each time.
Using the AdjustmentListener Interface Top
The AdjustmentListener listener interface is used for receiving adjustment events. Any classes interested in processing adjustment events should implement this interface. An object created with the
class is registered with a component using that component's addAdjustmentListener() method. When the adjustment event occurs on the component we have registered, the
adjustmentValueChanged(AdjustmentEvent e) method of the object is invoked.
In the following example we create a scrollable text area on the left of the frame to recieve messages when the scrollbar on the right of the frame is interacted with.
package info.java8;
import java.awt.*;              // AWT
import java.awt.event.*;        // AWT event package
import java.awt.Dimension;      // Component dimensions
import javax.swing.JFrame;      // An interactive window
import javax.swing.JScrollPane; // A scrolling pane for our text area
import javax.swing.JScrollBar;  // A scroll bar
import javax.swing.JTextArea;   // A text area

public class OurAdjustmentListener implements AdjustmentListener {
    JScrollPane taScrollPane;
    JTextArea ta;

    public static void main (String[] args) {
        OurAdjustmentListener oal = new OurAdjustmentListener();
        oal.start();
    }

    public void start() {
        JFrame jf = new JFrame("Using the AdjustmentListener Interface");
        // Create a non-editable text area
        ta = new JTextArea("This is a non-editable JTextArea.");
        ta.setEditable(false);
        ta.setLineWrap(true);
        ta.setWrapStyleWord(true);
        // Create a JScrollPane for our text area for when it gets filled with text
        taScrollPane = new JScrollPane(ta);
        taScrollPane.setVerticalScrollBarPolicy(JScrollPane.VERTICAL_SCROLLBAR_ALWAYS);
        taScrollPane.setPreferredSize(new Dimension(250, 250));
        jf.setBounds(300, 200, 568, 218);
        // Create and register a JScrollbar with our OurAdjustmentListener object
        JScrollBar vbar = new JScrollBar(JScrollBar.VERTICAL, 0, 40, 0, 218);
    	jf.add(BorderLayout.EAST, vbar);
        vbar.addAdjustmentListener(this);
        // Add JScrollPane to frame, set size and display it
        jf.add(BorderLayout.WEST, taScrollPane);
        jf.setDefaultCloseOperation(JFrame.EXIT_ON_CLOSE);
        jf.setVisible(true);
    }

    // Implement the only method from the AdjustmentListener Interface
    public void adjustmentValueChanged(AdjustmentEvent e) {
        ta.append("You used the scroll bar!");
    }
}
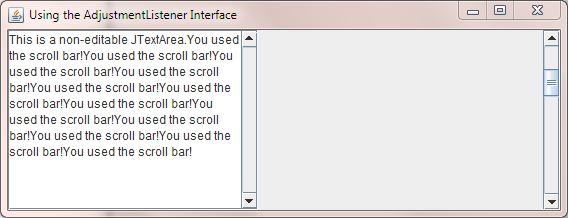
The following screenshot shows the results of compiling and running the OurAdjustmentListener class and scrolling the right scrolbar a few times. We implement the AdjustmentListener on our OurActionListener
top level class, create an instance of OurAdjustmentListener and call the start() method with this object. We then create a frame and and a scrolling pane that holds a text area. We then
add a scroll bar and register it with the invoking object (this), which is our OurAdjustmentListener object called oal. We then set up our frame and add our scroll pane and
scroll bar to the left and right regions of the frame. After this we implement the only method within the AdjustmentListener interface which is adjustmentValueChanged(AdjustmentEvent e).
Every time we press or move the scroll bar on the right this method is invoked and we append some text to the text area on the left.
Using the ItemListener Interface Top
The ItemListener listener interface is used for receiving item-selection events. Any classes interested in processing item-selection events should implement this interface. An object created
with the class is registered with a component using that component's addItemListener() method. When an item-selection event occurs on the component we have registered, the
itemStateChanged(ItemEvent e) method of the object is invoked.
In the following example we create a scrollable text area on the left of the frame to recieve messages when the radio buttons on the right of the frame are interacted with.
package info.java8;
import java.awt.*;               // AWT
import java.awt.event.*;         // AWT event package
import javax.swing.ButtonGroup;  // A button grouper
import javax.swing.JFrame;       // An interactive window
import javax.swing.JPanel;       // A container for our check boxes
import javax.swing.JRadioButton; // Interactive radio buttons
import javax.swing.JScrollPane; // A scrolling pane for our text area
import javax.swing.JTextArea;   // A text area

public class OurItemListener implements ItemListener {
    JRadioButton jrb1;
    JRadioButton jrb2;
    JRadioButton jrb3;
    JRadioButton jrb4;
    JScrollPane taScrollPane;
    JTextArea ta;

    public static void main (String[] args) {
        OurItemListener oil = new OurItemListener();
        oil.start();
    }

    public void start() {
        JFrame jf = new JFrame("Using the ItemListener Interface");
        // Create a non-editable text area
        ta = new JTextArea("This is a non-editable JTextArea.\n");
        ta.setEditable(false);
        ta.setLineWrap(true);
        ta.setWrapStyleWord(true);
        // Create a JScrollPane for our text area for when it gets filled with text
        taScrollPane = new JScrollPane(ta);
        taScrollPane.setVerticalScrollBarPolicy(JScrollPane.VERTICAL_SCROLLBAR_ALWAYS);
        taScrollPane.setPreferredSize(new Dimension(250, 250));
        // Add JScrollPane to frame, set size and display it
        jf.add(BorderLayout.WEST, taScrollPane);
        // Create some radio buttons
        jrb1 = new JRadioButton("One");
        jrb2 = new JRadioButton("Two");
        jrb3 = new JRadioButton("Three");
        jrb4 = new JRadioButton("Four");
        // Group the buttons so only one can be selected at a time
        ButtonGroup pickNumber = new ButtonGroup();
        pickNumber.add(jrb1);
    	pickNumber.add(jrb2);
    	pickNumber.add(jrb3);
    	pickNumber.add(jrb4);
        // Put the radio buttons in a column
        JPanel radioButtonPanel = new JPanel(new GridLayout(0, 1));
        radioButtonPanel.add(jrb1);
        radioButtonPanel.add(jrb2);
        radioButtonPanel.add(jrb3);
        radioButtonPanel.add(jrb4);
        // Add panel to our frame
        jf.add(radioButtonPanel, BorderLayout.EAST);
        // Register the radio buttons with our OurActionListener object
        jrb1.addItemListener(this);
        jrb2.addItemListener(this);
        jrb3.addItemListener(this);
        jrb4.addItemListener(this);
        // Set frame size and display it
        jf.setBounds(300, 200, 568, 218);
        jf.setDefaultCloseOperation(JFrame.EXIT_ON_CLOSE);
        jf.setVisible(true);
    }

    // Implement the only method from the ItemListener Interface
    public void itemStateChanged(ItemEvent e) {
        Object o = e.getSource();
        if (o instanceof JRadioButton) {
            // Downcast Object to JRadioButton so we can use methods of JRadioButton class
            ta.append("You selected radio button " + ((JRadioButton)o).getText() + "\n");
        }
    }
}
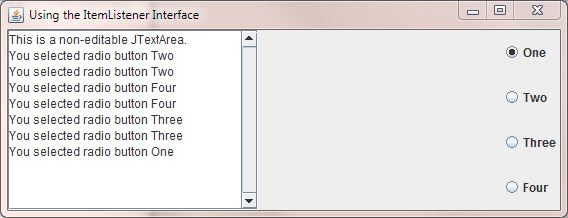
The following screenshot shows the results of compiling and running the OurItemListener class and pushing a few radio buttons on the right. We implement the ItemListener on our OurItemListener
top level class, create an instance of OurItemListener and call the start() method with this object. We then create a frame and and a scrolling pane that holds a text area. We then
some radio buttons which we put in a button group so only one can be selected at a time. We register all the radio buttons with the invoking object (this), which is our OurItemListener
object called oil. We then set up our frame and add our scroll pane and radio buttons scroll bar to the left and right regions of the frame. After this we implement the only method within the
ItemListener interface which is itemStateChanged(ItemEvent e). Every time we press a radio button on the right this method is invoked and we append some text to the text area on the
left. The text gets duplicated because as we change radio buttons there are two events, one for the radio button being deselected and another for the radio button being selected.
Lesson 6 Complete
In this lesson we looked at how we can intercept user actions and respond to them using event handling.
What's Next?
In our final lesson on Swing we look at dialogs which are windows that are displayed within the context of a parent window. Dialogs are often used to display some information, show messages to the user or prompt the user for input.