Swing ContainersJ8 Home « Swing Containers
In this lesson we look at the javax.swing.JFrame top-level container class, adding depth to frames using panes and the javax.swing.JPanel background container class.
Nearly all the Swing components we need to create our own GUI applications: buttons, check-boxes, text fields etc., extend from the javax.swing.JComponent class, the exceptions being top-level containers
such as javax.swing.JDialog and javax.swing.JFrame which are derived from their older AWT counterparts. Aside from top-level containers any Swing component can be placed into
another Swing component although common sense and usability preclude us for example, from putting another component within a button. In fact to use a component that inherits from the jComponent
class you must place the component in a containment hierarchy whose root is a top-level Swing container such as JDialog or JFrame. In essence this is what GUI
applications consist of, containers which we can think of as background components that contain related interactive components which a user can work with. This doesn't preclude user interaction with the
background components but the abstraction should help in visualising the structure.
So we construct our GUI applications by placing components within containers and to get everything to work all the components must fit into a top-level container. For our purposes we will be using the
javax.swing.JFrame and javax.swing.JPanel objects as our background component of choice to group our interactive components together whilst also taking a look at depth using panes. The
layout of the panels within our dialogs and frames and the components within our panels is controlled by Java objects known as layout managers and we will go into much more detail about these objects
in the Layout Managers lesson. For now its enough to know that a component that contains other components has a layout manager that controls the size and positioning of the components within it.
The javax.swing.JFrame Class Top
We saw some code in the last lesson where we created a window using the javax.swing.JFrame class and in this section we will take a much closer look at this top-level container. In that example
we used javax.swing.JFrame object to create our window but we can also extend from the JFrame class so we inherit the behaviour our class needs to function as a frame. When creating
our own frames there are several actions we need to perform on frame creation:
- Call a constructor method of the
JFrameclass using thenewoperator orsuperif we have subclassedJFrame. - Set up the title of the frame.
You set the title up when calling the constructor or by using thesetTitle()method that is inherited fromjava.awt.Frame. - Setup the size of the frame.
The size of the frame can be set by using thesetBounds()andpack()methods that are inherited fromjava.awt.Windowsor one of thesetSize()methods that are inherited fromjava.awt.Component. - Define an action for when the frame is closed by the user pressing the exit button.
- setDefaultCloseOperation(DISPOSE_ON_CLOSE) - Hide and dispose of the frame but keep running the application.
- setDefaultCloseOperation(DO_NOTHING_ON_CLOSE) - Keep the frame open and do nothing.
- setDefaultCloseOperation(EXIT_ON_CLOSE) - Exit program when the exit button is clicked using the
System exitmethod. - setDefaultCloseOperation(HIDE_ON_CLOSE) - Hide the frame and continue running the application.
- Make the frame visible if this is a requirement when starting up the application.
This can be achieved using thesetVisible()method that is inherited fromjava.awt.Component.
Lets take a look at an example of extending the JFrame class.
package info.java8;
import javax.swing.JFrame; // An interactive window

public class SubFrame extends JFrame {
    // Construct the frame
    public SubFrame() {
        super("Extending JFrame");
        setBounds(300, 200, 568, 218);
        setDefaultCloseOperation(JFrame.EXIT_ON_CLOSE);
        setVisible(true);
    }

    public static void main (String[] args) {
        SubFrame sf = new SubFrame();
    }
}
The following screenshot shows the results of compiling and running the SubFrame class on my Windows 7 system. The screenshot is of the far right and top part of my display which has a resolution
of 1920 x 1080. If you have a lower resolution you might have to adjust the first parameter of the setBounds() method to see the frame.
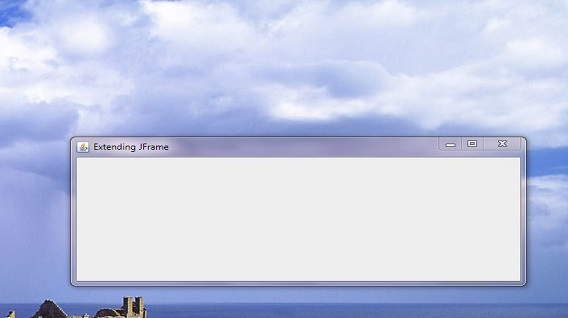
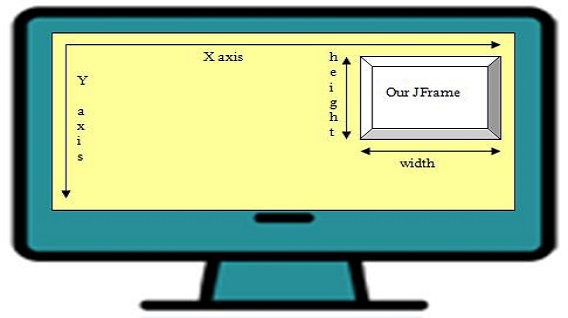
In the SubFrame() constructor we are calling the JFrame superconstructor that takes a string and passing it a name for our frame. The four parameters we are passing to the
setBounds() method correspond to the x-axis, y-axis, width and height of the frame respectively. The x-axis and y-axis are offsets from the top left corner of the displayable window and the width
and height set the size of the frame. All measurements are in pixels and so the actual positioning will vary dependant upon the screen size and resolution of the monitor used. We are also asking for the frame
to be closed and the application ended by using setDefaultCloseOperation(JFrame.EXIT_ON_CLOSE). The last thing we do is make the frame visible using the setVisible() method. The
following diagram should help to clarify the parameters used in the setBounds() method.
Centering a JFrame Top
So far we have just used the Swing library, which offers us lightweight components to use when creating our GUIs. The AWT library also comes with many useful classes to use in conjunction with
Swing to make GUI creation a simpler process. The following example shows how we can use the Dimension and Toolkit classes from the AWT library to center a frame on the screen.
package info.java8;
import java.awt.Dimension; // Component dimensions
import java.awt.Toolkit; // The toolkit
import javax.swing.JFrame;

public class CenterFrame extends JFrame {
    // Construct the frame
    public CenterFrame() {
        super("Centering a JFrame");
        Toolkit awt = this.getToolkit(); // Get toolkit
        this.setSize(new Dimension(568, 218)); // Use Dimension to set our frame size
        Dimension scrnsize = awt.getScreenSize(); // Get monitor screen size
        int x = (int) ((scrnsize.getWidth() - this.getWidth()) / 2); // Get width start position
        int y = (int) ((scrnsize.getHeight() - this.getHeight()) / 2); // Get height start position

        setBounds(x, y, 568, 218);
        setDefaultCloseOperation(JFrame.EXIT_ON_CLOSE);
        setVisible(true);
    }

    public static void main (String[] args) {
        CenterFrame cf = new CenterFrame();
    }
}
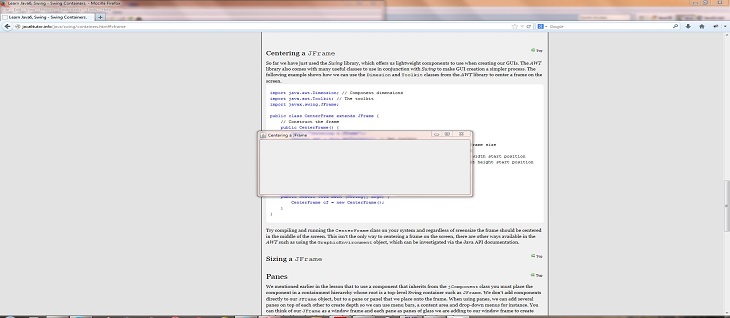
Try compiling and running the CenterFrame class on your system and regardless of screensize the frame should be centered in the middle of the screen as shown in the screenshot below. This isn't the
only way to center a frame on the screen, there are other ways available in the AWT such as using the GraphicEnvironment object, which can be investigated via the Java API documentation.
Sizing a JFrame Top
We can also automate the frame size using the Dimension and Toolkit classes from the AWT library to calculate the size from our monitor screen size. In the example below we
set the frame size to half of the monitor's screen size and center it in the middle of the screen.
package info.java8;
import java.awt.Dimension; // Component dimensions
import java.awt.Toolkit; // The toolkit
import javax.swing.JFrame;

public class SizeFrame extends JFrame {
    // Construct the frame
    public SizeFrame() {
        super("Sizing a JFrame");
        Toolkit awt = this.getToolkit(); // Get toolkit
        Dimension scrnsize = awt.getScreenSize(); // Get monitor screen size
        int a = (int) (scrnsize.getWidth() / 2); // Half monitor width
        int b = (int) (scrnsize.getHeight() / 2); // Half monitor height
        this.setSize(new Dimension(a, b)); // Use Dimension to set our frame size
        int x = (int) ((scrnsize.getWidth() - this.getWidth()) / 2); // Get width start position
        int y = (int) ((scrnsize.getHeight() - this.getHeight()) / 2); // Get height start position

        setBounds(x, y, a, b);
        setDefaultCloseOperation(JFrame.EXIT_ON_CLOSE);
        setVisible(true);
    }

    public static void main (String[] args) {
        SizeFrame cf = new SizeFrame();
    }
}
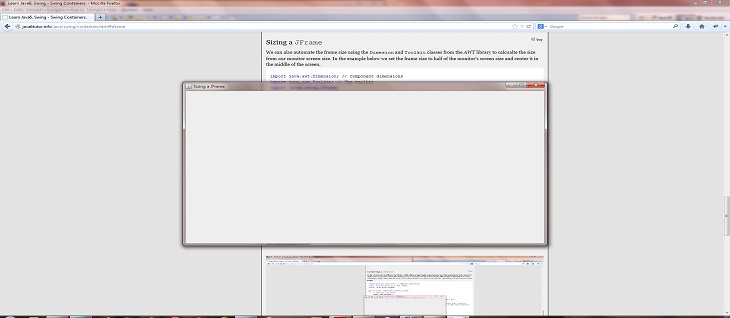
Try compiling and running the SizeFrame class on your system and regardless of screensize the frame should be centered in the middle of the screen and be half the size of the screen as shown in the screenshot below.
Panes Top
We mentioned earlier in the lesson that to use a component that inherits from the jComponent class you must place the component in a containment hierarchy whose root is a top-level Swing
container such as JFrame. We can only add components directly to our JFrame content pane, or to a pane or panel that we place onto the frame. When using panes, we can add several panes
on top of each other to create depth so we can use menu bars, a content area and drop-down menus for instance. You can think of our JFrame as a window frame and each pane as panes of glass we are
adding to our window frame to create single, double and triple glazing. The following diagram shows how this layering works:
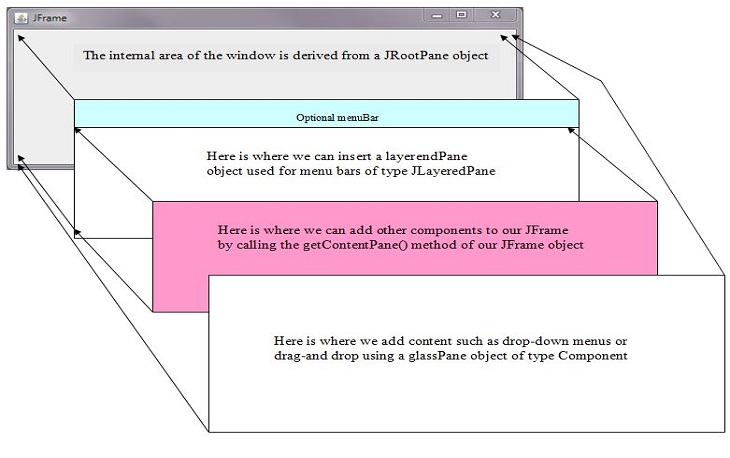
The whole of the content area within the frame is derived from a javax.swing.JRootPane object which extends the javax.swing.JComponent class. The JComponent method
getRootPane() can be used to obtain the JRootPane object that contains a given component. The JRootPane object is made up of a glassPane, an optional
menuBar and a contentPane. The layeredPane fills the entire viewable area of the JRootPane. The JLayeredPane object manages the
menuBar and contentPane panes. The glassPane sits over the top of everything where it can intercept mouse movements for drag-and-drop type actions and ensure any component
that needs to be on top of everything else is.
If a JMenuBar component, the optional menuBar of the JLayeredPane object, is set on the JRootPane, it is positioned along the upper edge of the frame. The
contentPane is adjusted in location and size to fill the remaining area below the JMenuBar or the whole area if no JMenuBar is present.
We can access any of the panes shown in the above diagram using the reference of a JFrame object and one of the methods in the table below.
| Method | Description |
|---|---|
getRootPane() | Returns the internal area of the frame as a JRootPane type. |
getLayeredPane() | Returns the layered pane as a JLayeredPane type. |
getContentPane() | Returns the content pane as a Container type. |
getGlassPane() | Returns the glass pane as a Component type. |
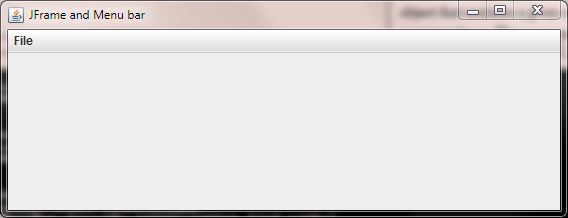
In the example below we create a simple frame and add a menu bar to it.
package info.java8;
import javax.swing.JFrame; // An interactive window
import javax.swing.JMenuBar; // A menu bar
import javax.swing.JMenu; // A menu
import javax.swing.JMenuItem; // A drop-down menu item

public class FrameMenuBar extends JFrame {
    private JMenuBar mb = new JMenuBar();
    private JMenuItem openItem, closeItem;

    // Construct the frame
    public FrameMenuBar() {
        super("JFrame and Menu bar");
        setBounds(300, 200, 568, 218);

        setJMenuBar(mb); // Add a menu bar to our frame
        JMenu fileMenu = new JMenu("File"); // Create File menu
        openItem = fileMenu.add("Open"); // Add open option
        closeItem = fileMenu.add("Close"); // Add close option
        mb.add(fileMenu); // Add file menu to menu bar

        setDefaultCloseOperation(JFrame.EXIT_ON_CLOSE);
        setVisible(true);
    }

    public static void main (String[] args) {
        FrameMenuBar fmb = new FrameMenuBar();
    }
}
Compiling and running the FrameMenuBar class should produce a screenshot like the one below. If you click on the File option the items we added will appear. Of course pressing these will
achieve nothing as we haven't coded anything for the user clicking on the items within our file menu.
The javax.swing.JPanel Class Top
The javax.swing.JPanel class is a generic lightweight container that we can use when we want to add one or more panels to a top-level or another background container. When we don't need to add
depth to our GUI, putting our components into panels and adding these to the contentPane pane is an easy option. The JPanel class is very easy and flexible to use, allowing us to add
multiple panels to a frame and panels to other panels as examples. The default layout manager for a frame is BorderLayout
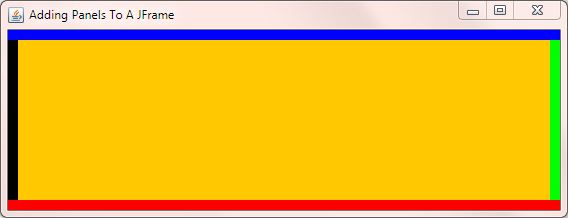
and to show an example of using panels we will add a panel with a different colour background to each area of this particular layout as shown in the example below.
package info.java8;
import java.awt.*; // AWT library
import javax.swing.JFrame; // An interactive window
import javax.swing.JPanel; // A lightweight container

public class FramePanels extends JFrame {
    // Construct the frame
    public FramePanels() {
        super("Adding Panels To A JFrame");
        JPanel jp1 = new JPanel();
        jp1.setBackground(Color.blue);
        this.getContentPane().add(BorderLayout.NORTH, jp1);
        JPanel jp2 = new JPanel();
        jp2.setBackground(Color.red);
        this.getContentPane().add(BorderLayout.SOUTH, jp2);
        JPanel jp3 = new JPanel();
        jp3.setBackground(Color.black);
        this.getContentPane().add(BorderLayout.WEST, jp3);
        JPanel jp4 = new JPanel();
        jp4.setBackground(Color.green);
        this.add(BorderLayout.EAST, jp4);
        JPanel jp5 = new JPanel();
        jp5.setBackground(Color.orange);
        this.add(BorderLayout.CENTER, jp5);

        setBounds(300, 200, 568, 218);
        setDefaultCloseOperation(JFrame.EXIT_ON_CLOSE);
        setVisible(true);
    }

    public static void main (String[] args) {
        FramePanels fp = new FramePanels();
    }
}
Compiling and running the FramePanels class should produce a screenshot like the one below. We have added a coloured panel to each area of the default frame layout
manager, BorderLayout. A point of interest here is how we can call the getContentPane() method to add to the frame or just add
components directly to our frame. Prior to java this wasn't possible and you had to get a reference to the content pane to add to the frame. If you are adding components to other panes then you still need to
get a reference to the pane required, as you can't add directly to any pane apart from the content pane.
Lesson 3 Complete
In this lesson we looked at the javax.swing.JFrame top-level container class, adding depth to frames using panes and the javax.swing.JPanel background container class.
What's Next?
In the next lesson we look at some of the interactive lightweight Swing components.