Encapsulation - Protecting Our DataJ8 Home « Encapsulation - Protecting Our Data
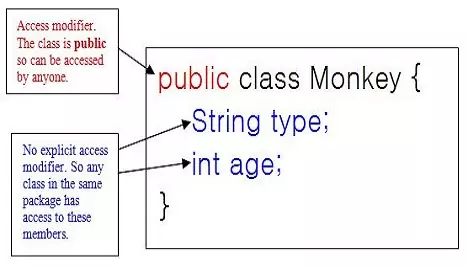
So now we know what encapsulation is and the access modifier mechanism Java uses to enforce it, how do we go about coding it? The following diagram is atypical of the classes we have written before and shows how our data is exposed:

Safeguarding Instance Variables Top
In the diagram above we unknowingly exposed our instance variables; by not setting an access modifier for them, they can now be tampered with by any class within the same package (package-default). So lets
correct this issue by giving our instance variables the private access modifier so these members are only accessible within the Monkey class.
package info.java8;
/*
  A Monkey Class
*/
public class Monkey {
    private String type;
    private int age;
}
Ok our instance variables have the private access modifier so now these members are only accessible within the Monkey class.
Lets test our new Monkey class:
package info.java8;
/*
  Test Class for Monkey
*/
public class TestMonkey {

    public static void main (String[] args) {
        Monkey mojo = new Monkey();
        mojo.type = "Orangutan";
        mojo.age = 25;
        System.out.println("Our " + mojo.type + " is " + mojo.age);
    }
}

The above screenshot shows the output of running our TestMonkey class. It doesn't compile because we are trying to access private members of the class which can only be accessed from inside the class. This is exactly what we want to protect our data, but how do we ever change a private instance variable then? We allow access to the private members of a class through the use of public methods.
Getters & Setters Top
So what we need are some public methods to get to our data. These are known as accessors and mutators or getters and setters. The convention when naming these methods is taken
from a JavaBeans standard of get<someProperty> and set<someProperty>. This convention was included as part of the certification but has been removed, but it is
still a standard and so will be used here. We will also refer to these methods as getters and setters. Ok lets revamp our Monkey class to include getters and
setter methods so we can access or modify our instance variables:
package info.java8;
/*
  A Monkey Class
*/
public class Monkey {
    private String type;
    private int age;
    /*
      Public getters and Setters
    */
    public String getType() {
        return type;
    }
    public void setType(String type) {
        this.type = type;
    }
    public int getAge() {
        return age;
    }
    public void setAge(int age) {
        this.age = age;
    }
}
When we name our getter and setter methods we use the name of the instance variable and capitalize the first letter. We then prefix this with get or set to adhere to the JavaBeans standard. The other
thing we must ensure to keep to this standard; is that all getter methods are not passed an argument and return a type, and that all setters methods are passed one argument and have a void return type.
Ok we should now be able to access our instance variables through the public getter and setter methods. Lets revamp our TestMonkey class to make sure our reworked Monkey class is working as expected:
package info.java8;
/*
  Test Class for Monkey
*/
public class TestMonkey {

    public static void main (String[] args) {
        Monkey mojo = new Monkey();
        mojo.setType("Orangutan");
        mojo.setAge(25);
        System.out.println("Our " + mojo.getType() + " is " + mojo.getAge());
    }
}
Save, run and compile the file in directory c:\_OOConcepts in the usual way.

TestMonkey class.The above screenshot shows the output of rerunning our TestMonkey class. The reworked Monkey class works fine now and we have encapsulated our data so it is only accessible through the public
getter and setter methods. Most of the time, what we have done in this lesson is all we need to encapsulate our data; other situations, with regards to inheritance and packaging, are covered in the appropriate lessons.
We haven't bothered with validation as the gist of the lesson is about encapsulation not validation. But it's good to know that we can now do all our validation within our setter methods, safe in the knowledge that if we need to change anything we aren't going to break other code elsewhere. This also means that the validation is in one place and only changes in one place, reducing maintenance and increasing reusability.
Related Quiz
OO Concepts Quiz 2 - Encapsulation - Protecting Our Data
Lesson 2 Complete
In this lesson we took a second look at encapsulation by using access modifiers to protect our data and allow access from public methods.
What's Next?
The next lesson introduces us to the OO concept of Inheritance, what it means and how we start to use it.